

Diablo Immortal
All Set Items Drop Locations and Bonuses

Where To Find All the Set Items
The only way to get Set items is by farming dungeons. At the end of each dungeon there’s a chance that a Set Item will drop. You can get up to 2 Set Items (Green Drops) from a Single Dungeon, one by defeating the final boss and the other from the dungeon’s bonus chest (4 man party only).
Specific set items are tied to each dungeon, please find down below the full list of where you can find all of them and the bonuses they give.
Press [Ctrl+F] and search to jump directly to the set you’re looking for.
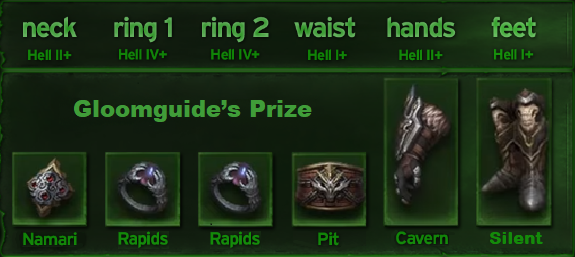
Gloomguide’s Prize Set
• 2/6 Bonus – Increases your damage done by 15% for three seconds after using a Dash skill.
• 4/6 Bonus – Increases your Critical Hit Chance by 22.5% for three seconds after using a Dash skill.
• 6/6 Bonus – Unleashes a wave of terror when your Dash skill ends, dealing X damage and causing nearby enemies to flee in Fear for three seconds. The wave of terror will only trigger when enemies are nearby but cannot occur more often than every 40 seconds.
Location:
Neck: The Stifled Wail - Dungeon: Temple of Namari [Hell 2+]
Hands: Rambler’s Nerve - Dungeon: Cavern of Echoes [Hell 2+]
Ring 1: Panicked Seconds - Dungeon: Kikuras Rapids [Hell 4+]
Ring 2: Curling Shadow - Dungeon: Kikuras Rapids [Hell 4+]
Waist: Chattertooth - Dungeon: Pit of Anguish [Hell 1+]
Feet: Unseen Stride - Dungeon: Silent Monastery [Hell 1+
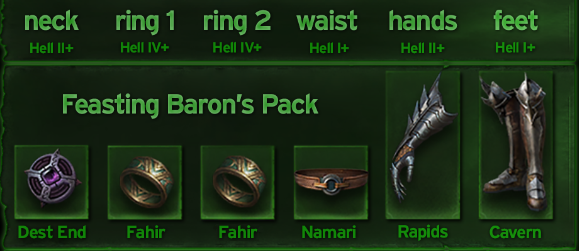
Feasting Baron’s Pack Set
• 2/6 Bonus – Increases the duration of your abilities that cause loss of control by 30%.
• 4/6 Bonus – Increases damage done from all sources by 20% to enemies suffering under your loss of control effects.
• 6/6 Bonus – Unleash a nova of ice each time you defeat an enemy afflicted by your loss of control effects, dealing X damage to nearby enemies and Freezing them for 4 seconds. Cannot occur more often than once every 40 seconds.
Location:
Neck: The Subjugator – Dungeon: Destruction’s End [Hell 2+]
Hands: The Mailed Fist – Dungeon: Kikura’s Rapids [Hell 2+]
Ring 1: The Prisoner – Dungeon: Tomb of Fahir [Hell 4+]
Ring 2: The Turnkey – Dungeon: Tomb of Fahir [Hell 4+]
Waist: The Gaoler – Dungeon: Temple of Namari [Hell 1+]
Feet: The Tyrant – Dungeon: Cavern of Echoes [Hell 1+]
Grace of the Flagellant Set
• 2/6 Bonuss – All continual damage, Channeled damage, and persistent ground damage increased by 15%.
• 4/6 Bonus – Each time you damage an individual enemy 5 times, you will do 287 additional damage to that enemy.
• 6/6 Bonus – Each time you deal damage, you have a 4% chance to unleash a lightning strike, dealing 1724 damage to all nearby enemies and Stunning them for 2 seconds. Cannot occur more often than once every 40 seconds.
Location:
Neck: Cut Throat – Dungeon: Cavern of Echoes [Hell 2+]
Hands: Bloody Hand – Dungeon: Pit of Anguish [Hell 2+]
Ring 1: Broken Palm – Dungeon: Temple of Namari [Hell 4+]
Ring 2: Severed Thumb – Dungeon: Temple of Namari [Hell 4+]
Waist: Open Gut – Dungeon: Silent Monastery [Hell 1+]
Feet: Torn Sole – Dungeon: Mad King’s Breach [Hell 1+]

Issatar Imbued Set
• 2/6 Bonus – Each time you defeat an enemy, you gain 30% increased Movement Speed for 3 seconds.
• 4/6 Bonus – Damage dealt increased by 2.5% for every 5% increase in your Movement Speed, up to a maximum damage increase of 25%.
• 6/6 Bonus – Each time you defeat an enemy, you have a 10% chance to gain an orbiting soul orb for 12 seconds, which deals X damage when it passes through an enemy. Cannot gain a soul orb more often than once every 40 seconds.
Location
Neck: Issatar Imbued – Dungeon: Mad King’s Breach [Hell 2+]
Hands: Issatar’s Hands – Dungeon: Forgotten Tower [Hell 2+]
Ring 1: Issatar Undone – Dungeon: Silent Monastery [Hell 4+]
Ring 2: Issatar Enraged – Dungeon: Silent Monastery [Hell 4+]
Waist: Issatar Contained – Dungeon: Tomb of Fahir [Hell 1+]
Feet: Issatar The Brute – Dungeon: Destruction’s End [Hell 1+]

Shepherd’s Call To Wolves Set
• 2/6 Bonus – Your summons deal 15% more damage.
• 4/6 Bonus – Critical Hit Chance increased by 3% for each of your summons, up to a maximum of 18%.
• 6/6 Bonus – Your summons enter a frenzied state for 12 seconds each time one of them critically hits. The frenzied state increases Attack Speed by 60%. Cannot occur more often than once every 40 seconds.
Location:
Neck: Shepherd and Architect – Dg: Tomb of Fahir [Hell 2+]
Hands: Shepherd and Beast – Dg: Destruction’s End [Hell 2+]
Ring 1: Shepherd and Father – Dg: Forgotten Tower [Hell 4+]
Ring 2: Shepherd and Mother – Dg: Forgotten Tower [Hell 4+]
Waist: Shepherd and Begetter – Dg: Kikura’s Rapids [Hell 1+]
Feet: Shepherd and Leader – Dg: Temple of Namari [Hell 1+]

Untouchable Mountebank Set
• 2/6 Bonus – Each time you take damage, you have a 20% chance to gain a shield that absorbs damage equal to 13% of your maximum Life. Cannot occur more often than once every 9 seconds.
• 4/6 Bonus – Shield’s damage absorption increased to 33% of your maximum Life, and you can move unhindered through enemies while this shield is active.
• 6/6 Bonus – Your shield has a 25% chance when it expires to explode for 40% of your maximum Life in damage to all nearby enemies.
Location:
Neck: Mountebank’s Flourish – Dg: Pit of Anguish [Hell 2+]
Hands: Mountebank’s Shirking – Dg: Silent Monastery [Hell 2+]
Ring 1: Mountebank’s Misdirection – Dg: Cavern of Echoes [Hell 4+]
Ring 2: Mountebank’s Marvel – Dg: Cavern of Echoes [Hell 4+]
Waist: Mountebank’s Bravado – Dg: Mad King’s Breach [Hell 1+]
Feet: Mountebank’s Slyness – Dg: Forgotten Tower [Hell 1+]

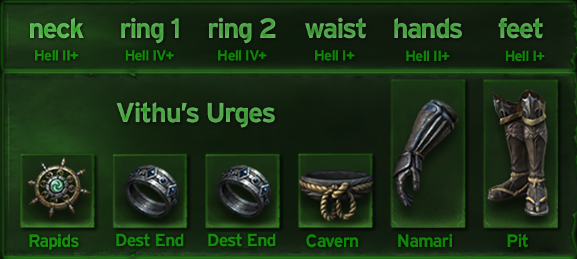
Vithu’s Urges Set
• 2/6 Bonus – Increases the duration of all beneficial effects on you or your party members by 30%.
• 2/6 Bonus – Increases the target’s Attack Speed by 30% for 3 seconds each time you use a skill to grant a beneficial effect to yourself or a party member.
• 2/6 Bonus – Each time you use a skill to buff yourself or a party member, creates an area of apotheosis for 10 seconds that grants 15% Life Drain to yourself and any party members within the area. Cannot occur more often than once every 40 seconds.
Location:
Neck: Awakener’s Urge – Dungeon: Kikura’s Rapids [Hell 2+]
Hands: Luminary’s Urge – Dungeon: Temple of Namari [Hell 2+]
Ring 1: Modest Urge – Dungeon: Destruction's End [Hell 4+]
Ring 2: Shameless Urge – Dungeon: Destruction's End [Hell 4+]
Waist: Exemplar’s Urge – Dungeon: Cavern of Echoes [Hell 1+]
Feet: Beacon’s Urge – Dungeon: Pit of Anguish [Hell 1+]
War Rags of Shal’baas Set
• 2/6 Bonus – Primary Attack Damage increased by 15%.
• 4/6 Bonus – Your Primary Attacks gradually increase your Attack Speed, up to a maximum of 25%.
• 6/6 Bonus – Your Primary Attacks have a 5% chance to increase your Primary Attack Speed for 12 seconds… this cannot occur more than once every 40 seconds.
Location:
Neck: Burning Heart – Dungeon: Silent Monastery [Hell 2+]
Hands: Dozen Strikes – Dungeon: Mad King’s Breach [Hell 2+]
Ring 1: Resting Fangs – Dungeon: Pit of Anguish [Hell 4+]
Ring 2: Braided Serpent – Dungeon: Pit of Anguish [Hell 4+]
Waist: Storm-Tack – Dungeon: Forgotten Tower [Hell 1+]
Feet: Wind-trods – Dungeon: Tomb of Fahir [Hell 1+]

Windloft Perfection Set
• 2/6 Bonus – Gain Thousand Winds, increasing your Movement Speed by 15%. Thousand Winds deactivates for 2 seconds if you take damage.
• 4/6 Bonus – Increases your damage done by 20% while Thousand Winds is active.
• 6/6 Bonus – Gain a shield that makes you immune to damage 5 times while Thousand Winds is active. Cannot gain this shield more often than once every 40 seconds.
Location:
Neck: Wisdom’s Edge – Dungeon: Forgotten Tower [Hell 2+]
Hands: Hurtling Steel – Dungeon: Tomb of Fahir [Hell 2+]
Ring 1: Fairfleet – Dungeon: Mad King’s Breach [Hell 4+]
Ring 2: Foulfleet – Dungeon: Mad King’s Breach [Hell 4+]
Waist: Whipcrack – Dungeon: Destruction’s End [Hell 1+]
Feet: Stump-Stir – Dungeon: Kikura’s Rapids [Hell 1+]

That’s everything you need to know for this Diablo Immortal Guide. If you are looking for more Diablo Immortal Guides, Builds and Tips feel free to explore our website or use any of the links below.
Want to become stronger in Diablo Immortal check out:
⬜ How to increase your Damage by thousands with Paragon System
⬜ How to Increase your Damage by more than 160% with Reforge Stones & Family Set Bonus
⬜ Other Diablo Immortal Resourcers
Also check out our latest 🎁giveaways🎁 for a chance to win prizes from us and our partners.